
Alright, so I had a change of heart with every post being in DWF, but it remains a great tool and freewheel can be of great use for yourself and for clients, so definitely check it out.
So you are placing rooms in your phased building but you have rooms that are not effected by the phases, what do you do? Anybody who has experienced this has realized that rooms can exist in only one phase and you have to replace all rooms for any additional phases. The phases of rooms can not be modified and are set by the phase of the view placed in.
Option #2 and a huge timesaver is as follows:
1.) Select all rooms in your project that you want to maintain through the phase change.
2.) Click to the menu Edit -- > Copy to Clipboard
3.) Change to the View of the new phase of your building
4.) Click to the menu Edit --> Paste Aligned --> Current View
This will copy all of your Rooms and their parameters to the new phase of your project so you do not need to recreate the rooms for the new phase.
Friday, December 22, 2006
Friday, December 15, 2006
Monday, September 25, 2006
Google Mobile Maps


During a meeting with Mike the other day, he mentioned traffic may be an issue going to the airport that afternoon and mentioned a good way to check using my blackberry. Introducing Google Mobile Maps. Logging on to the site www.google.com/gmm from my phone, it recognized the device instantly and then proceeded to download the software. Less than 5 minutes later everything was up and running. Pretty cool, oh and I made the flight with little traffic. :)
========================
Combining directions, maps, and satellite imagery, Google Maps for mobile is a free download that lets you find local hangouts and businesses across town or across the country - right from your BlackBerry.
To download, visit www.google.com/gmm on your BlackBerry browser. (US, France, Italy, Germany, Spain) Detailed directions: Whether you plan to walk or drive, your route is displayed on the map itself, together with step-by-step directions. Integrated search results: Local business locations and contact information appear all in one place, integrated on your map. Easily movable maps: Interactive, draggable maps let you zoom in or out, and move in all directions so you can orient yourself visually. Satellite imagery: Get a bird's eye view of your desired location. Real-time traffic:New! See where the congestion is, and estimate delays in over 30 major US metropolitan areas.
========================
Combining directions, maps, and satellite imagery, Google Maps for mobile is a free download that lets you find local hangouts and businesses across town or across the country - right from your BlackBerry.
To download, visit www.google.com/gmm on your BlackBerry browser. (US, France, Italy, Germany, Spain) Detailed directions: Whether you plan to walk or drive, your route is displayed on the map itself, together with step-by-step directions. Integrated search results: Local business locations and contact information appear all in one place, integrated on your map. Easily movable maps: Interactive, draggable maps let you zoom in or out, and move in all directions so you can orient yourself visually. Satellite imagery: Get a bird's eye view of your desired location. Real-time traffic:New! See where the congestion is, and estimate delays in over 30 major US metropolitan areas.
Monday, September 11, 2006
Working With Rooms & Green Building Studio
Rooms play an integral role in any gbXML export for use with Green Building Studio. If the room is not set correctly the geometry attached to the room will not export, thus will not be calculated in GBS. This could also lead to GBS not being able to complete any calculations of your design. The two main complications that can occur are the room's upper limit being incorrect and the calculate room volume box left unchecked. To check the room's upper limit settings you must first select the room object in question, and then browse to the properties.
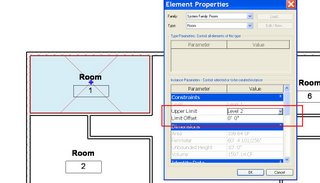
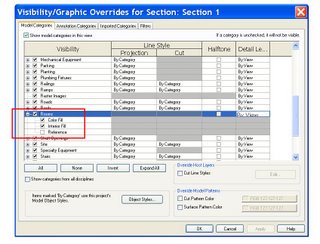
In the Upper Limit setting you can choose the level which the room extends up to. The Limit Offset allows you to adjust a specified height above or below that level. You can also look at a graphical representation of the room by cutting a section through the room and adjusting the Visibility Graphics of that view. Once you cut your section, go to that view, and enter VV on your keyboard to jump to the Visibility Graphics Override. Once there, browse down to the Room Category on the Models Category tab. Select the + sign next to the room to expand all subcategories and check the box next to Room. Also check the box next to the Interior Fill subcategory under Rooms. This will make the room visible in that section allowing you to graphically ensure that it meets the design intent.
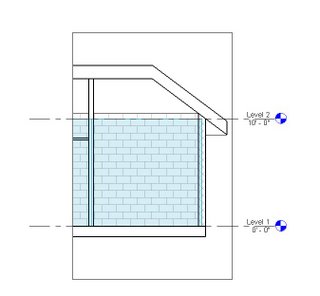
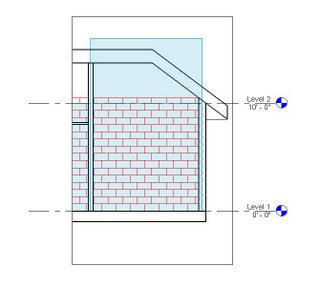
As seen in the rough example above, the room does not extend upwards to meet the roof. This would result in conflicts with the gbXML export. To correct this I need to adjust the Upper Limit and Offset settings. You want to ensure that the roof is completely encompassed by the room.
To ensure that the room volume is calculated prior to a gbXML export you need to browse to the Settings --> Room and Area Settings menu. In the dialog make sure that the Compute room volumes box is checked.
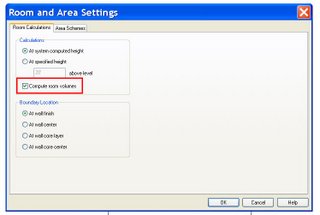
Correctly defining your room heights and calculating it's volume will assist you in producing an accurate gbXML export and in turn will produce an accurate energy model of your design.
Sunday, September 03, 2006
New gbXML Information in Revit Building 9.1
Revit 9.1 has added two important settings to be included in a gbXML export. These settings include Building Type and Zip Code of the project. To access these new settings browse to the Settings menu and select Project Information.
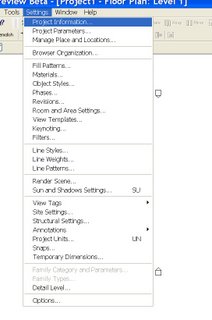
Now in the Construction group select Edit in the GBxml Settings value.
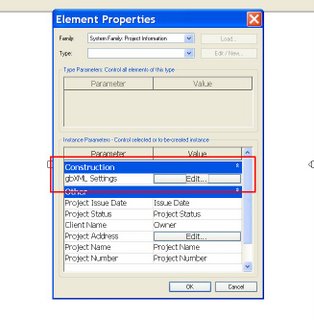
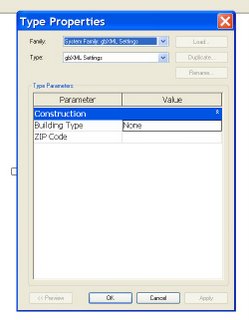
Input the appropriate information for your project and you are all set. This information will now be included in any gbXML file you export. Many programs use this information for things such as energy estimates, utility cost, etc.
Thursday, July 20, 2006
Material Take Off's With Revit 9
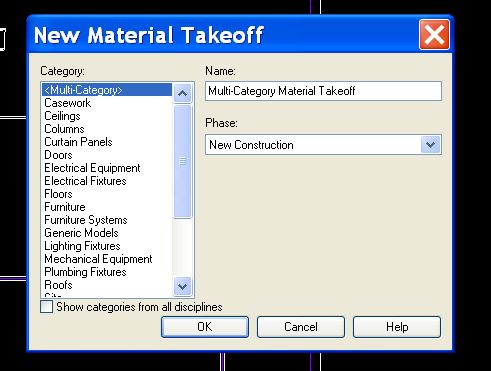
One of the larger features that was included with the Revit 9 release was material take off's. This feature allows us to easily schedule the type, quantity, etc. of materials that are used in our Revit designs. Needless to say, this is a huge part of green building. With this information we can also begin cost analysis & estimating directly from Revit. (A blog to come). To begin this process simply browse to the menu View --> New --> Material Takeoff. A dialog now appears where you can choose what you would like to create the material takeoff from.
You can also assign a name to the takeoff, and as with other schedules assign a specific phase. You can then add your paramaters and appropirately set up your takeoff as you would any other schedule with an end result of all the material information you need.
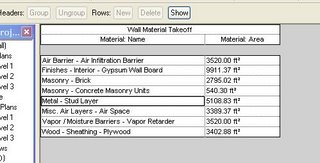
This feature is a huge step for the green designer for many reasons. Three major ones being: 1.) We can easily create common takeoffs & place them in our template & analyzie our material usage at very early stages in our design, thus allowing us to make prudent decisions on material usage. 2.) We can create a parameter to indicate a material to be recycled or new thus allowing us to evaluate recycled material percentages. 3.) We can input cost analaysis formulas into the schedules to analyzie the cost benefits of using alternative materials. With the fact that materials play such an important role in Green Building & Design, this feature is huge in the Green Design arena. More to come with this tool and some of the possibilities!

You can also assign a name to the takeoff, and as with other schedules assign a specific phase. You can then add your paramaters and appropirately set up your takeoff as you would any other schedule with an end result of all the material information you need.

This feature is a huge step for the green designer for many reasons. Three major ones being: 1.) We can easily create common takeoffs & place them in our template & analyzie our material usage at very early stages in our design, thus allowing us to make prudent decisions on material usage. 2.) We can create a parameter to indicate a material to be recycled or new thus allowing us to evaluate recycled material percentages. 3.) We can input cost analaysis formulas into the schedules to analyzie the cost benefits of using alternative materials. With the fact that materials play such an important role in Green Building & Design, this feature is huge in the Green Design arena. More to come with this tool and some of the possibilities!
Wednesday, June 28, 2006
Monday, June 26, 2006
Revit Warning Review
This is a great tip often overlooked for Revit users.
When working with Revit we get the Warning message that pops up, similar to the example below (this one was due to 2 door marks having the same number).

Most of the time we may have a reason for ignoring the warning, other times we may have just clicked away from the warning or had it disappear from the screen. The good news is you can easily review these warnings at any point. To do this go to the following pulldown: Tools>>Review Warnings

If your Review Warnings is greyed out it means you have no warnings at this time. This can be a good opportunity to review projects that are underway to make sure there are no issues that need attention.
Happy Revit'eering...
When working with Revit we get the Warning message that pops up, similar to the example below (this one was due to 2 door marks having the same number).

Most of the time we may have a reason for ignoring the warning, other times we may have just clicked away from the warning or had it disappear from the screen. The good news is you can easily review these warnings at any point. To do this go to the following pulldown: Tools>>Review Warnings

If your Review Warnings is greyed out it means you have no warnings at this time. This can be a good opportunity to review projects that are underway to make sure there are no issues that need attention.
Happy Revit'eering...
Energy Analysis w/ Revit & Green Building Studio
Have you ever wondered the energy consumtion of your design? Have you ever wondered the energy delta between two different design options? With Autodesk Revit & Green Building Studio you can easily export your drawing and run an energy audit and even compare different design options. Green Building Studio can be accessed at http://www.greenbuildingstudio.com. Your first step should be to download the GBS client from the website and complete the registration process from the website as well. From Revit you then simply need to export your Revit model into gbxml format. This can be done from the menu File --> Export --> gbXML.
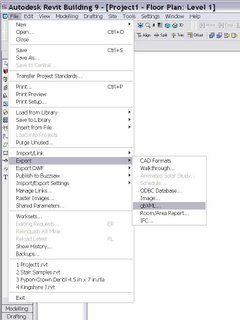
Take caution that there are no errors on export of the gbXML file, as errors exporting will likely lead to a failed energy analyis or erroneous results. Your next step is to go back to the Green Building Studio website and create a new project, this is web based and needs to be completed before opening the GBS client. Once the project is created and definitions set, open the GBS client. You should at that point see the project you just created in the Project dialog.
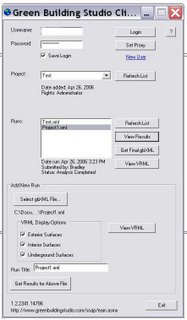
At this point you want to chose the Select gbXML File and browse to where the gbXML file you exported from Revit is located. Once the gbXML file has been selected choose the Get Results for Above File box and viola, you have an instantaneous approximate energy analysis of your design.
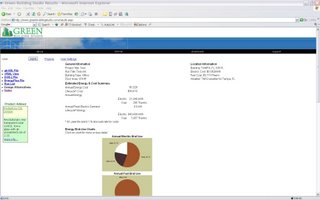
This article is intended to be a basic walk tru of the Green Building Studio process. I will follow future posts with some more in-depth articles and options that are available with this powerful tool. Version 2.0 of Green Building Studio was just released last month.

Take caution that there are no errors on export of the gbXML file, as errors exporting will likely lead to a failed energy analyis or erroneous results. Your next step is to go back to the Green Building Studio website and create a new project, this is web based and needs to be completed before opening the GBS client. Once the project is created and definitions set, open the GBS client. You should at that point see the project you just created in the Project dialog.
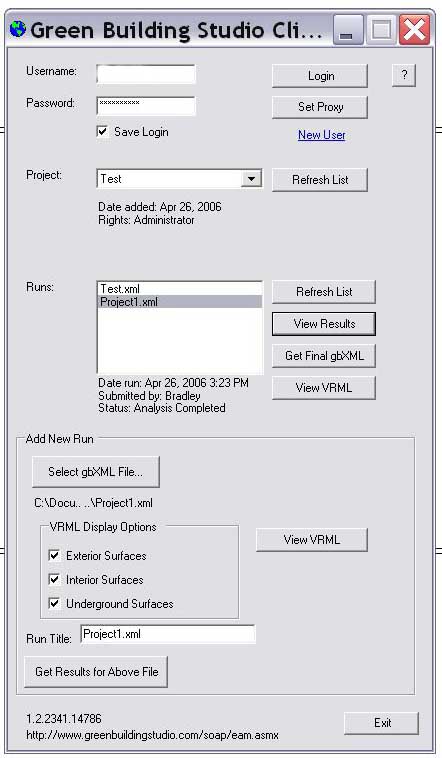
At this point you want to chose the Select gbXML File and browse to where the gbXML file you exported from Revit is located. Once the gbXML file has been selected choose the Get Results for Above File box and viola, you have an instantaneous approximate energy analysis of your design.
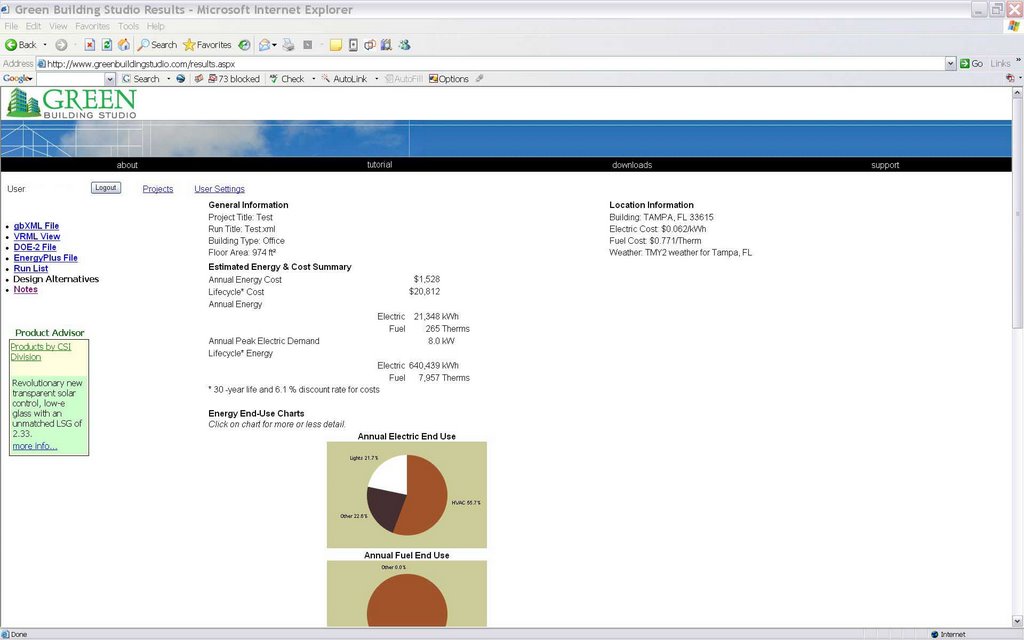
This article is intended to be a basic walk tru of the Green Building Studio process. I will follow future posts with some more in-depth articles and options that are available with this powerful tool. Version 2.0 of Green Building Studio was just released last month.
Wednesday, June 21, 2006
2006 FIFA World Cup Soccer and Autodesk
The FIFA World Cup is a large soccer/football tournament that occurs every 4 years. It is also one of the largest viewed events worldwide. This year the world cup is also being televised in HDTV format for the first time.
If you have been watching, chances are that you have seen content and commercials that were touched by an autodesk product. Rough overview of products include: Maya, Inferno, Flame, Smoke and Combusition. The original article can be found here.
Go USA
If you have been watching, chances are that you have seen content and commercials that were touched by an autodesk product. Rough overview of products include: Maya, Inferno, Flame, Smoke and Combusition. The original article can be found here.
Go USA
Wednesday, June 07, 2006
Autodesk Showcases Online Center for Sustainability
Autodesk has released an Online Center for Sustainability to correlate with the mini series they are sponsoring on PBS called design:e2. The web site can be found at http://www.autodesk.com/mini-sites/green/. The site is still relatively small, but it does provide different areas for people in green building, stories about green building, and a resource section with links to some external green building information. This is basically an introductory site for Sustainability but it does show that Autodesk is truly going to be Driving the Green Bim Highway. Autodesk is also sponsoring Design: e2 (the economies of being environmentally conscious), narrated by Brad Pitt and aired on PBS. This mini series covers green building and sustinability in a 6 part series. You can check listings at http://www.pbs.org.
Sunday, May 21, 2006
Driving the Green BIM Highway
With the world approaching a Green Revolution it is no surprise that BIM is settling in to be a major contributor to green design. As defined, BIM is not actually a technology but rather a methodology that can incorporate large amounts of information about a building’s design within the Building Information Model. Information that is essential in making prudent decisions about a building’s design with respect to green measures. The core philosophy behind green design is to create a dwelling that has minimal impact on its surrounding environment, while enhancing the building’s functionality and usability by its occupants. Some of the larger aspects of green design include energy efficiency, use of low impact non-hazardous materials, and reduction of waste throughout the construction process. To create and build a green building an incredible amount of planning and analysis must be done. Using traditional computer aided drafting tools this process is extremely time consuming and difficult. With the use of BIM, streamlining the green design process is becoming much easier and more efficient. This efficiency is stemming directly from the information that is created and stored within a BIM model. Using Revit as an example, it is now almost seamless to create an energy analysis of a building using two separate design options to compare energy impacts of each design. You can also instantaneously create material take off’s to analyze the materials being used in the building and also easily track the percentage of recycled verses non recycled materials being used in the project. These are just a few examples of how BIM is settling in to assist and help shape the Green Revolution. I will outline and demonstrate specific examples in the next posts.
Welcome to Green Revit
Welcome to Green Revit. I am setting out for this blog to be based around the Autodesk Revit platform, with a focus on the correlation between Revit and green building and design. I do intend to include a broad range of topics and programs as well. Hopefully this blog will help shine a spotlight on the new dawn of building design tools, Autodesk Revit.
Thursday, April 27, 2006
Free Google SketchUp?
That's right for those users who have heard the buzz about SketchUp now you can try this for free.
From the SketchUp site:
I'm pretty sure that the first part of this won't come as much of a surprise to anyone who knows anything about Google. In keeping with our "3D for Everyone" mission, and in an effort to let everybody and her grandmother find out about our software... (can you hear the drum-roll?) we're releasing a free version of SketchUp.
Right now the free download is only available for the Windows platform, but the Mac version is coming soon. More information about the free Google SketchUp can be found on the FAQ.
happy sketching up...
From the SketchUp site:
I'm pretty sure that the first part of this won't come as much of a surprise to anyone who knows anything about Google. In keeping with our "3D for Everyone" mission, and in an effort to let everybody and her grandmother find out about our software... (can you hear the drum-roll?) we're releasing a free version of SketchUp.
Right now the free download is only available for the Windows platform, but the Mac version is coming soon. More information about the free Google SketchUp can be found on the FAQ.
happy sketching up...
Monday, April 17, 2006
ADT 2007 - PSD Visibility & Order
Of the many features within ADT 2007 there are some overlooked gems that can make a large improvement in your workflow. For those taking advantage of Property Set Definitions and scheduling the list of items shown can be overwhelming. In the past we have had to use creative ways to shorten this list and sort it into a logical order, all of which were work arounds...
Until now... Introducing the PSD "Visible" & "Order" options:

Having the ability to keep the property set definitions available but not visible to the end user has a number of advantages and the sorting order only compliments this, especially as changes occur to your setup later.
Until now... Introducing the PSD "Visible" & "Order" options:
What can this really do for you? Good question. Instead of having a list that looks like this:
You can have it shortened to have your users only see the following sorted as desired:

This gives us a much shorter list to choose from and using an ordering system that we choose to use. To get the shortened version above we needed to check/uncheck the visibility option and then for the sorting order we used the Order option and simply entered a #1 for the start then continued as desired (ex. 1, 2, 3, 4, 5):

That was the good, now for the minor issue to take note of:
When checking the PSD visibility option you cannot select multiple boxes to check on/off quickly. :(
So far I have just been sorting by the column header to help with this, minor irritation but what this tool can help with outweighs the irritation. :)Having the ability to keep the property set definitions available but not visible to the end user has a number of advantages and the sorting order only compliments this, especially as changes occur to your setup later.
Saturday, April 01, 2006
April Fools - Google Earth
http://www.jarnot.com/mt/archives/2006/04/they_come_in_pe.php
Found this an interesting dose of fun in Google Earth. :)
enjoy and happy April fools day...
-b
Of course the other google april fools ones are funny too:
http://www.google.com/technology/pigeonrank.html
http://www.google.com/mentalplex/
http://www.google.com/jobs/lunar_job.html
http://www.google.com/googlegulp/
Found this an interesting dose of fun in Google Earth. :)
enjoy and happy April fools day...
-b
Of course the other google april fools ones are funny too:
http://www.google.com/technology/pigeonrank.html
http://www.google.com/mentalplex/
http://www.google.com/jobs/lunar_job.html
http://www.google.com/googlegulp/
Tuesday, March 14, 2006
Wednesday, March 08, 2006
Revit Structure & ETABS
I have been spending the last few days doing some Revit Structure training and one of the first issues I have seen come up is when working with some of the compatible analysis software. The installation, setup and workflow for each analysis software takes a small bit of time to work out.
If you have been able to get the ETABS link installed correctly you may notice in some cases that the option "Send Model to ETABS" (Tools>>External Tools) is greyed out. If this sounds familiar to you then chances are you may be trying to send to ETABS from an active view that Revit Structure does not like. Change your view to one of the following and you should be able to send your analytical model to ETABS.
The following active views work in Revit Structure 2:
Structural Plans, 3D Views - both the structure and analytical model, Elevations (Building Elevation), Elevations (Interior Elevation), Detail Views (Detail) , Drafting Views (Detail)
The following active views grey out the Send to ETABS option:
Graphical Column Schedules, Sections (Building Section), Sections (Wall Section), Legends Schedules/Quantities, Sheets (All)
If you have been able to get the ETABS link installed correctly you may notice in some cases that the option "Send Model to ETABS" (Tools>>External Tools) is greyed out. If this sounds familiar to you then chances are you may be trying to send to ETABS from an active view that Revit Structure does not like. Change your view to one of the following and you should be able to send your analytical model to ETABS.
The following active views work in Revit Structure 2:
Structural Plans, 3D Views - both the structure and analytical model, Elevations (Building Elevation), Elevations (Interior Elevation), Detail Views (Detail) , Drafting Views (Detail)
The following active views grey out the Send to ETABS option:
Graphical Column Schedules, Sections (Building Section), Sections (Wall Section), Legends Schedules/Quantities, Sheets (All)
Wednesday, March 01, 2006
Revit 9 - Interoperability
With the embargo lifted today on the next release of products here is a related nugget to what this weeks posts are about: IFC.
Revit Building now not only exports IFC files, but also imports as well. :)
Revit Building now not only exports IFC files, but also imports as well. :)
Tuesday, February 28, 2006
BIM Interoperability - Part I
In this post we will focus on taking a simple "Building Information Model" from one software package into another. For this example we will focus on two that most people are having trouble working between; Revit Building and Architectural Desktop (ADT), in a later post we will be working with other file formats and software.
Before we jump into creating geometry we need to review a new file type that you may/not have heard about; IFC. IFC stands for Industry Foundation Classes and is a file format not created by any CAD/BIM vendor (ex. Autodesk, Graphisoft, Bentley, SketchUp, etc...) but instead is a vendor neutral format. Who is responsible for the development of the IFC? Good question, the IFC's were created by the IAI (International Alliance for Interoperability) with the goal of creating a way to exchange BIM type of data. More about the IAI mission can be found here: http://www.iai-na.org/about/mission.php
So what does this mean for those using BIM platforms? Another good question, let's start with a real scenario in which one firm who specializes in design and another that specializes in taking this data through to construction documents. This is becoming more common place as firms and companies specialize in certain niche markets. So Design Company A begins the design of a project using Revit Building. As they reach the submittal date for their portion of the project to be delivered to CD Company B who is using Architectural Desktop.
=====
Disclaimer: Before you begin to rant and tell me how this would not happen and that company B should go ahead and use Revit to complete the project or that company A should have started this in ADT, spend a few months doing BIM consulting with large and small companies across the country and you see things in a whole new light. To clarify both Revit and ADT can create production documentation from start to finish on their own, this scenario is for those who need to blend these together.
====
At this point Company B has a compressed time schedule ahead of them to finish the CD set of documents. Design Company A has given them the Revit model, exported .dwg files of each sheet (including xrefs, etc...) and a hardcopy set of files. They need to start working, when you export Revit data to .dwg it is exported as simple AutoCAD geometry (lines, arcs, circles, blocks, etc...). CD Company B needs to get started right away, should they just start tracing/converting the cad geometry already provided using AEC objects?
Another approach may be to utilize IFC's. In Revit Building this can be accomplished by exporting to IFC (Ex. File>>Export>>IFC...). When exporting from Revit Building 8.1 it uses the IFC 2x2 format.
====
At the time of this post (Feb. 2006) the IFC format for IFC 2x Edition 3 (2x3) was just released.
====
From the ADT side we then need to import the IFC file. Architectural Desktop does not currently have a way built-in to import/export IFC files. To accomplish this we can use a plug-in from Inopso GmbH that will allow use to import/export IFC 2x and 2x2 format. This does have a cost associated with it and only runs on a single computer per license, but it will bring in the exported file as AEC objects.
As it stands now this method is not 100% seamless and there is some clean-up that is still needed. In the next post we will be looking at examples of this process and providing a few files for you to play with.
Before we jump into creating geometry we need to review a new file type that you may/not have heard about; IFC. IFC stands for Industry Foundation Classes and is a file format not created by any CAD/BIM vendor (ex. Autodesk, Graphisoft, Bentley, SketchUp, etc...) but instead is a vendor neutral format. Who is responsible for the development of the IFC? Good question, the IFC's were created by the IAI (International Alliance for Interoperability) with the goal of creating a way to exchange BIM type of data. More about the IAI mission can be found here: http://www.iai-na.org/about/mission.php
So what does this mean for those using BIM platforms? Another good question, let's start with a real scenario in which one firm who specializes in design and another that specializes in taking this data through to construction documents. This is becoming more common place as firms and companies specialize in certain niche markets. So Design Company A begins the design of a project using Revit Building. As they reach the submittal date for their portion of the project to be delivered to CD Company B who is using Architectural Desktop.
=====
Disclaimer: Before you begin to rant and tell me how this would not happen and that company B should go ahead and use Revit to complete the project or that company A should have started this in ADT, spend a few months doing BIM consulting with large and small companies across the country and you see things in a whole new light. To clarify both Revit and ADT can create production documentation from start to finish on their own, this scenario is for those who need to blend these together.
====
At this point Company B has a compressed time schedule ahead of them to finish the CD set of documents. Design Company A has given them the Revit model, exported .dwg files of each sheet (including xrefs, etc...) and a hardcopy set of files. They need to start working, when you export Revit data to .dwg it is exported as simple AutoCAD geometry (lines, arcs, circles, blocks, etc...). CD Company B needs to get started right away, should they just start tracing/converting the cad geometry already provided using AEC objects?
Another approach may be to utilize IFC's. In Revit Building this can be accomplished by exporting to IFC (Ex. File>>Export>>IFC...). When exporting from Revit Building 8.1 it uses the IFC 2x2 format.
====
At the time of this post (Feb. 2006) the IFC format for IFC 2x Edition 3 (2x3) was just released.
====
From the ADT side we then need to import the IFC file. Architectural Desktop does not currently have a way built-in to import/export IFC files. To accomplish this we can use a plug-in from Inopso GmbH that will allow use to import/export IFC 2x and 2x2 format. This does have a cost associated with it and only runs on a single computer per license, but it will bring in the exported file as AEC objects.
As it stands now this method is not 100% seamless and there is some clean-up that is still needed. In the next post we will be looking at examples of this process and providing a few files for you to play with.
Subscribe to:
Posts (Atom)