Thursday, May 31, 2007

and its a boy....


For those that have not yet heard the announcement, we had our second child.

Announcing: Callum Von Merrick Turner


Weighing in at 7lb 14oz and 20" long. Labor went well, in fact too fast as we did not make it to the hospital and instead we were fortunate to have the experience of a home birth. 1 hour start to finish for all laboring, push 1, 2, 3 (all pushes being less than 3 minutes total) and out this bundle of joy came.
Here is the happy big brother:

Mom and everyone are doing quite well...

Monday, May 07, 2007

GTD Outlook Plug-In

1 comments
Matt pointed out that he has been using the GTD outlook plug-in and it is working pretty well. I have been pondering this for some time to help with my own implementation. For now with the upgrade to Vista I will be waiting until Mid-June for this to be available.

Once available I think I will go ahead and make the plunge. There is a trial version of this (though not for Vista, except possibly beta) available for you to test as well. I did test the demo version for a short period of time before my last machine quit, unfortunately not long enough to really get a feel for things. :(

If you have been using this or have something to offer on the subject, leave a comment.

Happy GTD'ing...

Sunday, May 06, 2007

Accomplishing Goals - Chunking


Those who have been around me the last 6 months know that I have been focusing more attention to the GTD methodology in my professional and personal life.

Having lived through the multi-tasking mentality and its lack of long-term effectiveness I have been working on an idea called "productive task time". Today I ran across an interesting term called Chunking which is very similar to the PTT.

The idea of each is to set aside defined "chunks" of time for events/tasks instead of mutli-tasking a number of events at the same time. If you are having trouble juggling multiple tasks and giving them the proper attention to completion that they deserve give this idea a try.

Saturday, May 05, 2007

Happy Cinco De Mayo

0 comments
Just a quick post to wish you a happy and safe Cinco De Mayo.

Thursday, May 03, 2007

AIA San Antonio


I have been at the AIA convention in San Antonio this week for some meetings and classes. Yesterday was a great day of sessions about Integrated Design Practices.

From the show floor a couple of technology items that stood out:

1. Tectonic Objects Collection - a good library of information that helps you organize, find and file your families. You can start with their existing library (looks like a decent start) or add your own. Another good item was the ability to add a "tag" to your content that would show your "optimized" families vs. downloaded ones or those from Tectonic. Also included is a general guideline for family naming conventions, for those who do not have one yet this can help you get started. Thanks Dennis and Charlie

2. Green Building Studio - In addition to the great product they have been developing/expanding the last few years, another set of new features coming out are Carbon Footprint and Energy Analysis tools. Another that is not yet released, but looks promising, is the detailed "Climate Server", listed as a high resolution climate server, this provides detailed weather analysis for 65,000 locations will provide a pretty detailed report for your project locations including: Dry Bulb Temperature, Dew Point Temperature, Relative Humidity, Wind Speed and Direction, Direct Normal Radiation, Precipitation Rate, Total Sky cover and more for energy analysis. Thanks John.

Sunday, April 22, 2007

Happy Earth Day... And the Revit API

2 comments

Happy Earth Day to everyone as we all strive to create our sustainable future. With that, the new releases of Revit are being unvailed and we are seeing greater flexibility and maturation of the API.

What is the API and why is it green?

API stands for Application Programmable Interface. It essentially is the plug that allows any third party to tap into Revit to utilize or manipulate the information and components of a Revit Building Information Model. The Revit API is shaping up to play a crucial role in analyzing BIM data for sustainable design purposes. The upcoming release of Revit Systems utilizes the API to synchronize directly with IES to analyze ASHARE loads calculations, annual thermal simulation, and Daylighting Assesment. (I will have much more to come on IES and Revit). The API is ultimately what is going to allow external tools to access our BIM data and streamline the analysis of the building that is essential in its design. You can find in depth information on the Revit API and what is new in the upcoming release at the Cad Application Development Blog. This blog is written by Matt Mason who is the Director of Software Development at Avatech Solutions. Matt has also created the Avatech Earth Connector, a Revit plugin that allows you to export your Revit model directly into Google Earth.

The Revit API is going to play a major role in the ability of third party analysis tools to access our BIM data to develop powerful streamlined tools that we can use to analyze our designs at all stages that allow us to make prudent decisions in regards to sustainability. With the continued development of the Revit API I believe that we will see more integration with advanced tools such as IES and many other technologies to come.

Happy Earth Day!!

Sunday, April 01, 2007

Google Fools Day


http://www.google.com/tisp/install.html

Googles April Fools Day TiSP - wireless internet access via your home commode

Thursday, March 08, 2007

Free Starbucks?


Looks like next week Starbucks will be giving away a free cup of coffee on March 15, 2007 from 10:00am - 12:00pm.

http://consumerist.com/consumer/strabucks/free-starbucks-next-week-242448.php

Of course it cannot be any worse than the line for the one in the MGM Grand in Vegas where I have been visiting this week, thankfully I have a few well placed folks in line that are on speed-dial. ;)

Beware of the lines...

Sunday, March 04, 2007

My trip to "Vista" land - A short chronicle of my upgrade to MS Vista


A short while back I got a new notebook. Up to this point I have been using Windows XP, well the time has come to upgrade to Vista. I elected for a clean-build and since I still have a bit of consulting to do I went with a dual-boot option.

To do this the M65 has a DVD drive replacement that is a 80gb hard-drive.

The dell hard-drive arrived and so did the Vista DVD. Installation was relatively easy, though there were a few tricky sections:

1. Copied DVD content to hard-drive.
2. Installed new Drive bay, formatted drive and assigned drive letter (D:)
3. While logged into XP on the machine I started the Vista installation from Step #1 above.
4. All checks went well and installation started, sort-of. Each time I input the serial number it would run for another 5-10 minutes then fail with a message saying " vista could not update the boot configuration". This kept up, rebooted, etc... Still the same issue. After a bit of reading I came across two items that helped:

4a. The first was a registry hack, make a back-up before you play with this; http://www.technipages.com/article249.html

4b. The second was to not put in the serial number when first asked. You will be prompted later to input this, you will need to know which version of Vista you have. In my case I selected Business Edition early on then later input the serial number.

Once these adjustments were done, Vista installation went pretty quick. A few reboots later to finish (which it did automatically) and Vista was up and running.

Software installed so far:
Office 2007, Photoshop, MasterListPro and Buzzsaw.

Office installed quick and easy. Photoshop CS2 kept asking me to register, though this was already done each time I started up. This ended up requiring me to right click the start icon and choose to run this as administrator.

MLP has not been tested yet as a restart was needed and productivity time is short this weekend for the deadlines I am working to meet. Since I have been focused on GTD, this is one of my tools that I rely on quite heavily. Thankfully I have my printed list as a carry around. :)

The full buzzsaw client installed easily and has been working with no noticeable issues.

Next is the new line of autodesk products... This part should be exciting.

The Vista gadgets (widgets) offer some useful items as well, so far I have found the following useful: battery meter, alarm clock and Call Wave voicemail. This is a great way to burn some time reviewing all the extra gadgets, find what works and remove the rest.

Wednesday, February 28, 2007

Calculating Glazing to Floor Area Ratios With Revit

0 comments
One of the larger aspects of Sustainable Building is energy efficiency. One of the main factors of energy efficiency is using the appropriate amount of glazing in our design as it relates to the total floor area in a room or overall building. We can simplify this process in Revit and actually create a 'Glazing Area Schedule' to inform us if the ratio of glazing to floor area we used exceeds sustainable design criteria. This will allow immediate awareness of over utilization of glazing in a design. The purpose of this schedule is to inform designers if the amount of total glazing in a room or a building exceeds the desired amount in relationship to the overall floor area.

Below is an example of the schedule with two different window sizes, the first that would cause the room to overheat and second that does not.


To begin the process we will need to first create a Window Schedule with the following default parameters from Revit:

Family & Type
From Room: Unbounded Height
From Room: Volume
From Room: Name

(For this example I will only be using the From Room: variables to calculate the needed information. If needed, both the 'from' and the 'to' room' parameters can be used.)

The following custom Parameter were used to hold needed information in the Glazing Area Schedule:

North
South
East
West

I created the above parameters as Project Parameters associated with windows. These parameters allow for the Glazing Area Schedule to calculate the orientation of each individual window. These parameters will need to be set for each window in the design.

The following Calculated Values were used to compute the necessary information to obtain the overheat determination:

Window Area Width * Height / 1 SF
Glazing Area of Room % of Window Area: From Room: Name
Overall Glazing Area Window Area / Glazing Area of Room
Glazing Percentage of Room Overall Glazing Area / Room Area
Room Area From Room: Volume / From Room: Unbounded Height / 1 SF
Glazing Multiplier if(North, 0.05, if(South, 0.15, if(West, 0.07, if(East, 0.07, 1))))
Overheat Integer if(Glazing Percentage of Room < Glazing Multiplier, 1, 2)
Overheat if(Overheat Integer = 1, "no", "yes")


This tools is just a concept for leveraging the power behind Revit to assist us in smarter design. With unlimited potential, Revit can help us transcend to the green utopia.

Tuesday, January 16, 2007

Visual Maps


The last few days have been busy with documenting; workflows, services and marketing. Having gotten stuck for some terminology I did a quick websearch for a thesaurus and ran across the following: http://www.visualthesaurus.com/.

After a few minutes of playing with the technology this helped me to get past my idea block and opened up a few new ideas on where I was going. If you are looking for an interesting approach on using the dictionary/thesaurus this is an item you should review.

On a random though, this technology is built-on ThinkMap which offers some interesting possibilities for development related to the AEC market.

Friday, December 22, 2006

Phases & Rooms In Revit

3 comments
Alright, so I had a change of heart with every post being in DWF, but it remains a great tool and freewheel can be of great use for yourself and for clients, so definitely check it out.

So you are placing rooms in your phased building but you have rooms that are not effected by the phases, what do you do? Anybody who has experienced this has realized that rooms can exist in only one phase and you have to replace all rooms for any additional phases. The phases of rooms can not be modified and are set by the phase of the view placed in.

Option #2 and a huge timesaver is as follows:

1.) Select all rooms in your project that you want to maintain through the phase change.
2.) Click to the menu Edit -- > Copy to Clipboard
3.) Change to the View of the new phase of your building
4.) Click to the menu Edit --> Paste Aligned --> Current View

This will copy all of your Rooms and their parameters to the new phase of your project so you do not need to recreate the rooms for the new phase.

Friday, December 15, 2006

Green Revit Is Going DWF

4 comments

Monday, September 25, 2006

Google Mobile Maps


During a meeting with Mike the other day, he mentioned traffic may be an issue going to the airport that afternoon and mentioned a good way to check using my blackberry. Introducing Google Mobile Maps. Logging on to the site www.google.com/gmm from my phone, it recognized the device instantly and then proceeded to download the software. Less than 5 minutes later everything was up and running. Pretty cool, oh and I made the flight with little traffic. :)

========================

Combining directions, maps, and satellite imagery, Google Maps for mobile is a free download that lets you find local hangouts and businesses across town or across the country - right from your BlackBerry.

To download, visit www.google.com/gmm on your BlackBerry browser. (US, France, Italy, Germany, Spain) Detailed directions: Whether you plan to walk or drive, your route is displayed on the map itself, together with step-by-step directions. Integrated search results: Local business locations and contact information appear all in one place, integrated on your map. Easily movable maps: Interactive, draggable maps let you zoom in or out, and move in all directions so you can orient yourself visually. Satellite imagery: Get a bird's eye view of your desired location. Real-time traffic:New! See where the congestion is, and estimate delays in over 30 major US metropolitan areas.

Monday, September 11, 2006

Working With Rooms & Green Building Studio

4 comments
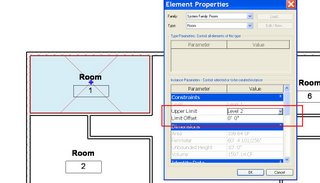
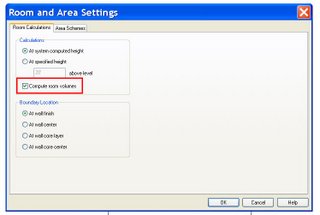
Rooms play an integral role in any gbXML export for use with Green Building Studio. If the room is not set correctly the geometry attached to the room will not export, thus will not be calculated in GBS. This could also lead to GBS not being able to complete any calculations of your design. The two main complications that can occur are the room's upper limit being incorrect and the calculate room volume box left unchecked. To check the room's upper limit settings you must first select the room object in question, and then browse to the properties.


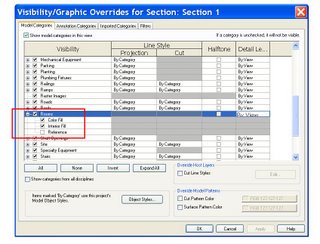
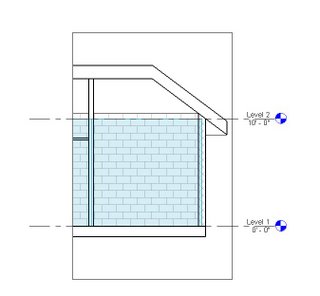
In the Upper Limit setting you can choose the level which the room extends up to. The Limit Offset allows you to adjust a specified height above or below that level. You can also look at a graphical representation of the room by cutting a section through the room and adjusting the Visibility Graphics of that view. Once you cut your section, go to that view, and enter VV on your keyboard to jump to the Visibility Graphics Override. Once there, browse down to the Room Category on the Models Category tab. Select the + sign next to the room to expand all subcategories and check the box next to Room. Also check the box next to the Interior Fill subcategory under Rooms. This will make the room visible in that section allowing you to graphically ensure that it meets the design intent.


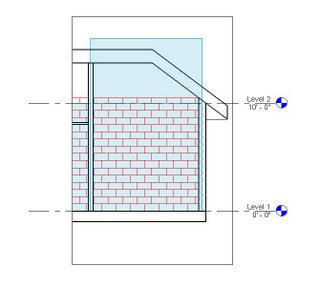
As seen in the rough example above, the room does not extend upwards to meet the roof. This would result in conflicts with the gbXML export. To correct this I need to adjust the Upper Limit and Offset settings. You want to ensure that the roof is completely encompassed by the room.


To ensure that the room volume is calculated prior to a gbXML export you need to browse to the Settings --> Room and Area Settings menu. In the dialog make sure that the Compute room volumes box is checked.

Correctly defining your room heights and calculating it's volume will assist you in producing an accurate gbXML export and in turn will produce an accurate energy model of your design.

Sunday, September 03, 2006

New gbXML Information in Revit Building 9.1

0 comments
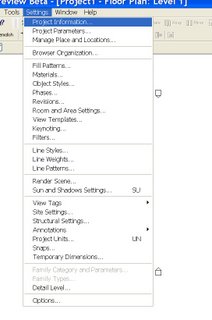
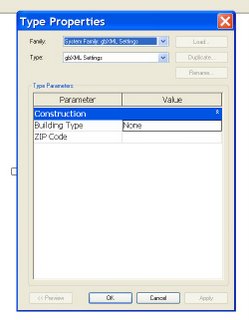
Revit 9.1 has added two important settings to be included in a gbXML export. These settings include Building Type and Zip Code of the project. To access these new settings browse to the Settings menu and select Project Information.

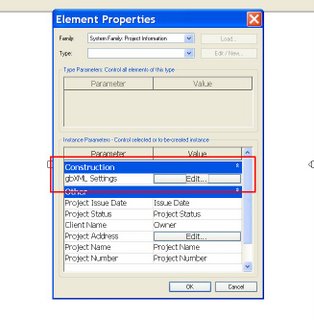
Now in the Construction group select Edit in the GBxml Settings value.


Input the appropriate information for your project and you are all set. This information will now be included in any gbXML file you export. Many programs use this information for things such as energy estimates, utility cost, etc.

Thursday, July 20, 2006

Material Take Off's With Revit 9

0 comments
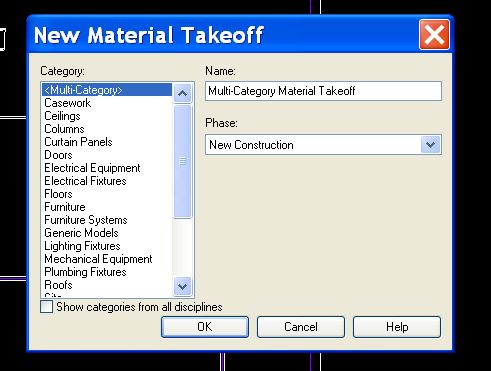
One of the larger features that was included with the Revit 9 release was material take off's. This feature allows us to easily schedule the type, quantity, etc. of materials that are used in our Revit designs. Needless to say, this is a huge part of green building. With this information we can also begin cost analysis & estimating directly from Revit. (A blog to come). To begin this process simply browse to the menu View --> New --> Material Takeoff. A dialog now appears where you can choose what you would like to create the material takeoff from.


You can also assign a name to the takeoff, and as with other schedules assign a specific phase. You can then add your paramaters and appropirately set up your takeoff as you would any other schedule with an end result of all the material information you need.


This feature is a huge step for the green designer for many reasons. Three major ones being: 1.) We can easily create common takeoffs & place them in our template & analyzie our material usage at very early stages in our design, thus allowing us to make prudent decisions on material usage. 2.) We can create a parameter to indicate a material to be recycled or new thus allowing us to evaluate recycled material percentages. 3.) We can input cost analaysis formulas into the schedules to analyzie the cost benefits of using alternative materials. With the fact that materials play such an important role in Green Building & Design, this feature is huge in the Green Design arena. More to come with this tool and some of the possibilities!

Wednesday, June 28, 2006

Google Earth + Revit


For those using Google Earth and Revit; the Revit Earth Connector has now been released allowing you to take your Revit Model directly into Google Earth. More information about the Earth Connector can be found here.

Download the Revit Earth Connector here.

happy Revit'eering...

Monday, June 26, 2006

Revit Warning Review


This is a great tip often overlooked for Revit users.

When working with Revit we get the Warning message that pops up, similar to the example below (this one was due to 2 door marks having the same number).


Most of the time we may have a reason for ignoring the warning, other times we may have just clicked away from the warning or had it disappear from the screen. The good news is you can easily review these warnings at any point. To do this go to the following pulldown: Tools>>Review Warnings


If your Review Warnings is greyed out it means you have no warnings at this time. This can be a good opportunity to review projects that are underway to make sure there are no issues that need attention.

Happy Revit'eering...

Energy Analysis w/ Revit & Green Building Studio

1 comments
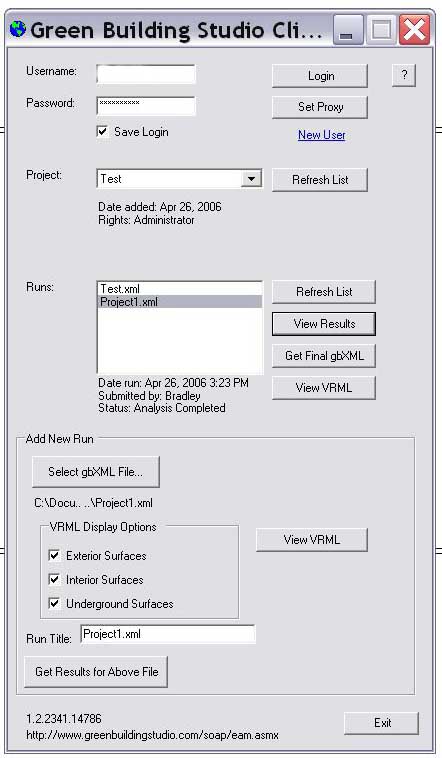
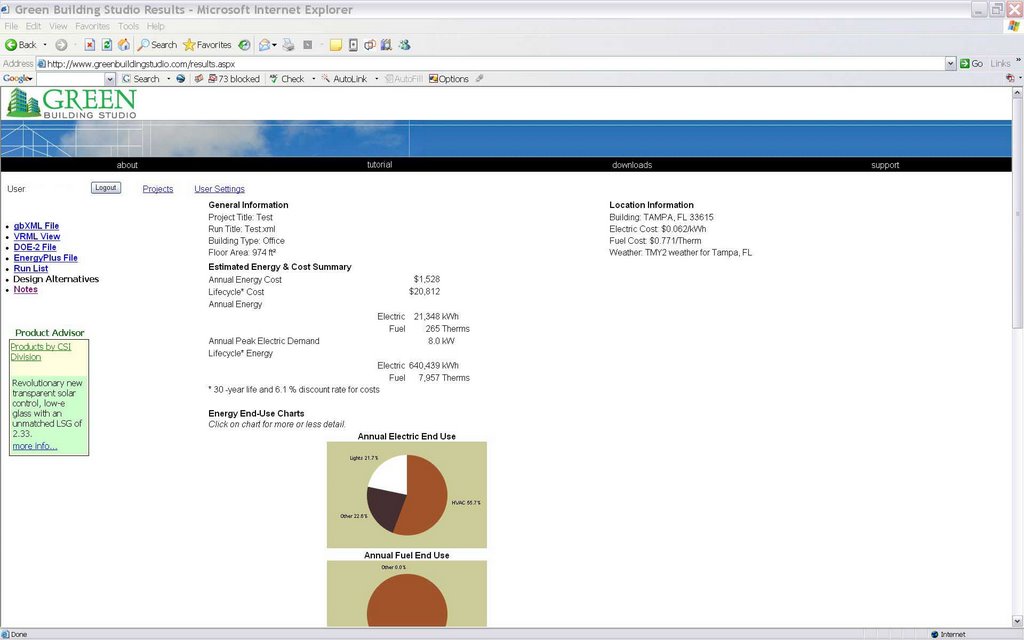
Have you ever wondered the energy consumtion of your design? Have you ever wondered the energy delta between two different design options? With Autodesk Revit & Green Building Studio you can easily export your drawing and run an energy audit and even compare different design options. Green Building Studio can be accessed at http://www.greenbuildingstudio.com. Your first step should be to download the GBS client from the website and complete the registration process from the website as well. From Revit you then simply need to export your Revit model into gbxml format. This can be done from the menu File --> Export --> gbXML.


Take caution that there are no errors on export of the gbXML file, as errors exporting will likely lead to a failed energy analyis or erroneous results. Your next step is to go back to the Green Building Studio website and create a new project, this is web based and needs to be completed before opening the GBS client. Once the project is created and definitions set, open the GBS client. You should at that point see the project you just created in the Project dialog.


At this point you want to chose the Select gbXML File and browse to where the gbXML file you exported from Revit is located. Once the gbXML file has been selected choose the Get Results for Above File box and viola, you have an instantaneous approximate energy analysis of your design.


This article is intended to be a basic walk tru of the Green Building Studio process. I will follow future posts with some more in-depth articles and options that are available with this powerful tool. Version 2.0 of Green Building Studio was just released last month.
 

Copyright 2009 All Rights Reserved Beau Turner Triple D Design, LLC | Template design by Brian Gardner | Converted to Blogger Template by Bloganol dot com